ผู้เขียน หัวข้อ: MySQL Proxy On CentOS 5  (อ่าน 13535 ครั้ง)

0 สมาชิก และ 1 บุคคลทั่วไป กำลังดูหัวข้อนี้

ออฟไลน์ มนตรี บอยรักยุ้ยคนเดียว

  • Hero Member
  • *****
  • กระทู้: 5,369
  • Respect: +12
    • ดูรายละเอียด
    • โรงพยาบาลชุมชน ด่านมะขามเตี้ย
MySQL Proxy On CentOS 5
« เมื่อ: กุมภาพันธ์ 09, 2011, 20:03:51 PM »
0
Installing MySQL Proxy On CentOS 5 (FINAL) x86_64


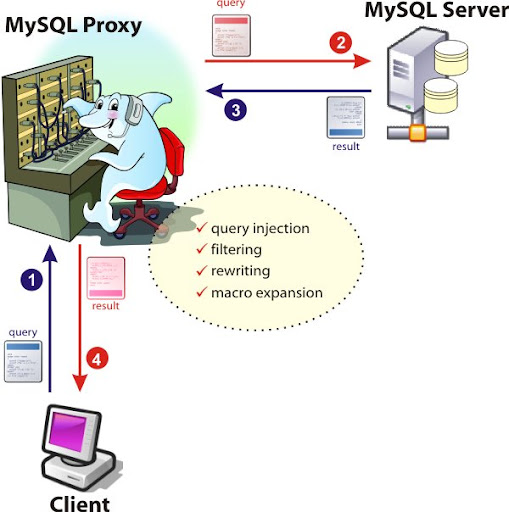
This tutorial explains how you can install MySQL Proxy on a CentOS 5 (x86_64) system. MySQL Proxy is a simple program that sits between your client and MySQL server(s) that can monitor, analyze or transform their communication. Its flexibility allows for unlimited uses; common ones include: load balancing; failover; query analysis; query filtering and modification; and many more.

On a fresh minium Centos 5 final x86_64 install:

yum install gcc.x86_64 libevent.x86_64 libevent-devel.x86_64 readline.x86_64 readline-devel.x86_64 ncurses.x86_64 ncurses-devel.x86_64 glib2.x86_64 glib2-devel.x86_64

cd /usr/local/src/

wget http://www.lua.org/ftp/lua-5.1.3.tar.gz
tar zxvf lua-5.1.3.tar.gz

cd lua-5.1.3
make linux
make install

wget http://dev.mysql.com/get/Downloads/MySQL-Cluster-6.2/mysql-5.1.23-ndb-6.2.15-linux-x86_64-glibc23.tar.gz/from/http://www.mirrorservice.org/sites/ftp.mysql.com/

tar xzvf mysql-5.1.23-ndb-6.2.15-linux-x86_64-glibc23.tar.gz
ln -s mysql-5.1.23-ndb-6.2.15-linux-x86_64-glibc23 mysql

PATH=$PATH:/usr/local/mysql/bin
export PATH

Edit your .profile to make this permanent:

# .bash_profile
   
# Get the aliases and functions
if [ -f ~/.bashrc ]; then
        . ~/.bashrc
fi
 
# User specific environment and startup programs
 
PATH=$PATH:/usr/local/mysql/bin:$HOME/bin
 
export PATH
unset USERNAME

wget http://dev.mysql.com/get/Downloads/MySQL-Proxy/mysql-proxy-0.6.1.tar.gz/from/http://www.mirrorservice.org/sites/ftp.mysql.com/

tar zxvf mysql-proxy-0.6.1.tar.gz
cd mysql-proxy-0.6.1

./configure  LDFLAGS="-lm -ldl" LUA_CFLAGS="-I/usr/local/include/" LUA_LIBS=/usr/local/lib/liblua.a

make
make install

Let's create a sample LUA script so you can see some logs.

mkdir /var/log/mysql-proxy/
mkdir -p /usr/local/mysql/lua-scripts/

vi /usr/local/mysql/lua-scripts/simple-log.lua

(see: http://www.oreillynet.com/pub/a/databases/2007/07/12/getting-started-with-mysql-proxy.html?page=3

Script modified to get IP and to use  proxy.connection.server.thread_id.)

local log_file = '/var/log/mysql-proxy/mysql.log'
local fh = io.open(log_file, "a+")
 
function read_query( packet )
 if string.byte(packet) == proxy.COM_QUERY then
   local query = string.sub(packet, 2)
   fh:write( string.format("%s %6d -- %s :IP %s :USER: %s\n",
   os.date('%Y-%m-%d %H:%M:%S'),
   proxy.connection.server.thread_id,
   query,
   proxy.connection.client.address,
   proxy.connection.client.username))
  fh:flush()
 end
end

Now start up your proxy using the variable --proxy-backend-addresses to point the proxy at your servers.

/usr/local/sbin/mysql-proxy --proxy-lua-script=/usr/local/mysql/lua-scripts/simple-log.lua --proxy-backend-addresses=192.168.1.33:3306 --proxy-backend-addresses=192.168.1.34:3306 --daemon

192.168.1.33 and 192.168.1.34 are the MySQL nodes that the proxy will be connecting to.

Allow connections for the proxy through your firewall:

### ALLOWED TO CONNECT TO MYSQL PROXY
###
### LOCAL ADMINS
-A INPUT -s SRC-IP -d DST-IP -p tcp -m state --state NEW -m tcp --dport 4040 -j ACCEPT

Where  DST-IP is my proxy server and  SRC-IP is my local box (client machine).

Now from your local box (not the mysql-proxy server) try and connect to the backend databases through the proxy ( user with relevent permissions must exist in the db).

mysql -u dba_admin -p -h PROXY-SERVER -P 4040

Welcome to the MySQL monitor.  Commands end with ; or \g.
Your MySQL connection id is 16 to server version: 5.1.23-ndb-6.2.15

Type 'help;' or '\h' for help. Type '\c' to clear the buffer.

mysql> show databases;

+--------------------+
| Database           |
+--------------------+
| information_schema |
| Imap_Forms         |
| mysql              |
| test               |
+--------------------+
4 rows in set (0.01 sec)

mysql> quit

Bye

N.B. The proxy uses the port 4040 instead of 3306.

Test the mysql-proxy admin interface from the mysql-proxy server:

mysql -u root -p -h 127.0.0.1 -P 4041

Welcome to the MySQL monitor.  Commands end with ; or \g.
Your MySQL connection id is 1
Server version: 5.1.20-agent MySQL Enterprise Agent

Type 'help;' or '\h' for help. Type '\c' to clear the buffer.

mysql> select * from proxy_connections;

+------+--------+-------+------+
| id   | type   | state | db   |
+------+--------+-------+------+
|    0 | server | 0     |      |
|    1 | proxy  | 0     |      |
|    2 | server | 10    |      |
+------+--------+-------+------+
3 rows in set (0.00 sec)

mysql>quit

bye
ที่มา : http://www.howtoforge.com/installing-mysql-proxy-on-centos5-x86_64

แนะนำ อีกทางเลือก
« แก้ไขครั้งสุดท้าย: กุมภาพันธ์ 09, 2011, 20:13:55 PM โดย บอย[ด่านมะขามเตี้ย] »
เริ่ม11พย.2548OPD-Paperlessพร้อมHOSxPลดโลกร้อน
FF-Paperless(รพ.สค.)เริ่ม1ตค2555=100%
IPD-Lesspaper1ตค2560ระบบDmsByNeoNetwork
IPD-Paperless1พ.ค2562ระบบHOSxPXE4
ServerMTOL8.5+MDB-10.4.20,SlaveOL8.5+MDB-10.7.3
LOG=PostgreSQL11,INV=PostgreSQL11

ออฟไลน์ มนตรี บอยรักยุ้ยคนเดียว

  • Hero Member
  • *****
  • กระทู้: 5,369
  • Respect: +12
    • ดูรายละเอียด
    • โรงพยาบาลชุมชน ด่านมะขามเตี้ย
Re: ODBC installation on CentOS for PostgreSQL DB
« ตอบกลับ #1 เมื่อ: กุมภาพันธ์ 09, 2011, 21:19:26 PM »
0
ODBC installation on CentOS for PostgreSQL DB

[root@localhost ~]# yum -y install unixODBC.i386 unixODBC-devel.i386

[root@localhost ~]# wget http://yum.pgsqlrpms.org/8.3/redhat/rhel-5-i386/postgresql-odbc-08.03.0100-1PGDG.rhel5.i686.rpm
[root@localhost ~]# rpm -i postgresql-odbc-08.03.0100-1PGDG.rhel5.i686.rpm
[root@localhost ~]# vi /etc/odbc.ini
...
[PSQL]
Description = My Database
Driver = PostgreSQL
Trace = No
TraceFil = /tmp/odbc.log
Database = postgres
Servername = postgresql-server
Username = postgres
Password = tunafish
Port = 5432
ReadOnly = No
...

[root@localhost ~]# vi /etc/odbcinst.ini
...
[PostgreSQL]
Description = ODBC for PostgreSQL
Driver = /usr/lib/libodbcpsql.so
Setup = /usr/lib/libodbcpsqlS.so
FileUsage = 1
...

[root@localhost ~]# isql PSQL
+---------------------------------------+
| Connected! |
+---------------------------------------+
SQL>
...

[root@localhost ~]#
เริ่ม11พย.2548OPD-Paperlessพร้อมHOSxPลดโลกร้อน
FF-Paperless(รพ.สค.)เริ่ม1ตค2555=100%
IPD-Lesspaper1ตค2560ระบบDmsByNeoNetwork
IPD-Paperless1พ.ค2562ระบบHOSxPXE4
ServerMTOL8.5+MDB-10.4.20,SlaveOL8.5+MDB-10.7.3
LOG=PostgreSQL11,INV=PostgreSQL11

ออฟไลน์ มนตรี บอยรักยุ้ยคนเดียว

  • Hero Member
  • *****
  • กระทู้: 5,369
  • Respect: +12
    • ดูรายละเอียด
    • โรงพยาบาลชุมชน ด่านมะขามเตี้ย
Re: PostgreSQL Installation on CentOS (Linux i386)
« ตอบกลับ #2 เมื่อ: กุมภาพันธ์ 09, 2011, 21:20:33 PM »
0
คู่มือ
http://pgfoundry.org/docman/view.php/1000048/1338/PostgreSQL-RPM-Installation-PGDG.pdf

[root@localhost ~]# mkdir postgreSQL

[root@localhost ~]# cd postgreSQL

[root@localhost postgreSQL]# wget http://yum.pgsqlrpms.org/8.3/redhat/rhel-5-i386/postgresql-libs-8.3.4-1PGDG.rhel5.i386.rpm

[root@localhost postgreSQL]# wget http://yum.pgsqlrpms.org/8.3/redhat/rhel-5-i386/postgresql-8.3.4-1PGDG.rhel5.i386.rpm

[root@localhost postgreSQL]# wget http://yum.pgsqlrpms.org/8.3/redhat/rhel-5-i386/postgresql-server-8.3.4-1PGDG.rhel5.i386.rpm

[root@localhost postgreSQL]# rpm -i postgresql-libs-8.3.4-1PGDG.rhel5.i386.rpm

[root@localhost postgreSQL]# rpm -i postgresql-8.3.4-1PGDG.rhel5.i386.rpm

[root@localhost postgreSQL]# rpm -i postgresql-server-8.3.4-1PGDG.rhel5.i386.rpm

[root@localhost postgreSQL]# service postgresql initdb
Initializing database: [ OK ]

[root@localhost postgreSQL]# su - postgres

-bash-3.2$ vi /var/lib/pgsql/data/pg_hba.conf
...
local all all trust
host all all 127.0.0.1/32 trust
host all all 192.168.10.0/24 md5
...

-bash-3.2$ psql
Welcome to psql 8.2.9, the PostgreSQL interactive terminal.
...
postgres=# alter user postgres with password '';
...

-bash-3.2$ vi /var/lib/pgsql/data/pg_hba.conf
...
local all all md5
host all all 127.0.0.1/32 md5
host all all 192.168.10.0/24 md5
...

-bash-3.2$ vi /var/lib/pgsql/data/postgresql.conf
...
listen_addresses = '*'
...

-bash-3.2$ exit

[root@localhost postgreSQL]# /etc/init.d/postgresql start
Starting postgresql service: [ OK ]

« แก้ไขครั้งสุดท้าย: กุมภาพันธ์ 09, 2011, 21:24:29 PM โดย บอย[ด่านมะขามเตี้ย] »
เริ่ม11พย.2548OPD-Paperlessพร้อมHOSxPลดโลกร้อน
FF-Paperless(รพ.สค.)เริ่ม1ตค2555=100%
IPD-Lesspaper1ตค2560ระบบDmsByNeoNetwork
IPD-Paperless1พ.ค2562ระบบHOSxPXE4
ServerMTOL8.5+MDB-10.4.20,SlaveOL8.5+MDB-10.7.3
LOG=PostgreSQL11,INV=PostgreSQL11

ออฟไลน์ มนตรี บอยรักยุ้ยคนเดียว

  • Hero Member
  • *****
  • กระทู้: 5,369
  • Respect: +12
    • ดูรายละเอียด
    • โรงพยาบาลชุมชน ด่านมะขามเตี้ย
Re: ODBC intallation on CentOS
« ตอบกลับ #3 เมื่อ: กุมภาพันธ์ 09, 2011, 21:21:47 PM »
0
Installation of ODBC drivers

[root@localhost ~]# wget http://downloads.sourceforge.net/iodbc/libiodbc-3.52.6-1.i386.rpm
[root@localhost ~]# wget http://downloads.sourceforge.net/iodbc/libiodbc-devel-3.52.6-1.i386.rpm
[root@localhost ~]# rpm -i libiodbc-3.52.6-1.i386.rpm
[root@localhost ~]# rpm -i libiodbc-devel-3.52.6-1.i386.rpm
เริ่ม11พย.2548OPD-Paperlessพร้อมHOSxPลดโลกร้อน
FF-Paperless(รพ.สค.)เริ่ม1ตค2555=100%
IPD-Lesspaper1ตค2560ระบบDmsByNeoNetwork
IPD-Paperless1พ.ค2562ระบบHOSxPXE4
ServerMTOL8.5+MDB-10.4.20,SlaveOL8.5+MDB-10.7.3
LOG=PostgreSQL11,INV=PostgreSQL11

ออฟไลน์ มนตรี บอยรักยุ้ยคนเดียว

  • Hero Member
  • *****
  • กระทู้: 5,369
  • Respect: +12
    • ดูรายละเอียด
    • โรงพยาบาลชุมชน ด่านมะขามเตี้ย
Re: php-5.2 สำหรับ CentOS แบบ 64 บิต (x86_64)
« ตอบกลับ #4 เมื่อ: กุมภาพันธ์ 09, 2011, 21:27:02 PM »
0
สำหรับผู้ที่ติดตั้ง CentOS แบบ 64 บิต (x86_64) ดาวน์โหลด php 5.2 ที่เว็บไซต์นี้ครับ http://www.atoomnet.net/centos_updated_php.php หรือคลิ๊กที่ลิ้งค์

wget http://www.atoomnet.net/./php/php-5.2.17/php-5.2.17-1.x86_64.rpm
wget http://www.atoomnet.net/./php/php-5.2.17/php-bcmath-5.2.17-1.x86_64.rpm
wget http://www.atoomnet.net/./php/php-5.2.17/php-cli-5.2.17-1.x86_64.rpm
wget http://www.atoomnet.net/./php/php-5.2.17/php-common-5.2.17-1.x86_64.rpm
wget http://www.atoomnet.net/./php/php-5.2.17/php-dba-5.2.17-1.x86_64.rpm
wget http://www.atoomnet.net/./php/php-5.2.17/php-devel-5.2.17-1.x86_64.rpm
wget http://www.atoomnet.net/./php/php-5.2.17/php-eaccelerator-5.2.17_0.9.6.1-1.x86_64.rpm
wget http://www.atoomnet.net/./php/php-5.2.17/php-gd-5.2.17-1.x86_64.rpm
wget http://www.atoomnet.net/./php/php-5.2.17/php-imap-5.2.17-1.x86_64.rpm
wget http://www.atoomnet.net/./php/php-5.2.17/php-ldap-5.2.17-1.x86_64.rpm
wget http://www.atoomnet.net/./php/php-5.2.17/php-mbstring-5.2.17-1.x86_64.rpm
wget http://www.atoomnet.net/./php/php-5.2.17/php-mcrypt-5.2.17-1.x86_64.rpm
wget http://www.atoomnet.net/./php/php-5.2.17/php-mhash-5.2.17-1.x86_64.rpm
wget http://www.atoomnet.net/./php/php-5.2.17/php-mssql-5.2.17-1.x86_64.rpm
wget http://www.atoomnet.net/./php/php-5.2.17/php-mysql-5.2.17-1.x86_64.rpm
wget http://www.atoomnet.net/./php/php-5.2.17/php-ncurses-5.2.17-1.x86_64.rpm
wget http://www.atoomnet.net/./php/php-5.2.17/php-odbc-5.2.17-1.x86_64.rpm
wget http://www.atoomnet.net/./php/php-5.2.17/php-pdo-5.2.17-1.x86_64.rpm
wget http://www.atoomnet.net/./php/php-5.2.17/php-pgsql-5.2.17-1.x86_64.rpm
wget http://www.atoomnet.net/./php/php-5.2.17/php-readline-5.2.17-1.x86_64.rpm
wget http://www.atoomnet.net/./php/php-5.2.17/php-snmp-5.2.17-1.x86_64.rpm
wget http://www.atoomnet.net/./php/php-5.2.17/php-soap-5.2.17-1.x86_64.rpm
wget http://www.atoomnet.net/./php/php-5.2.17/php-tidy-5.2.17-1.x86_64.rpm
wget http://www.atoomnet.net/./php/php-5.2.17/php-xml-5.2.17-1.x86_64.rpm
wget http://www.atoomnet.net/./php/php-5.2.17/php-xmlrpc-5.2.17-1.x86_64.rpm
เริ่ม11พย.2548OPD-Paperlessพร้อมHOSxPลดโลกร้อน
FF-Paperless(รพ.สค.)เริ่ม1ตค2555=100%
IPD-Lesspaper1ตค2560ระบบDmsByNeoNetwork
IPD-Paperless1พ.ค2562ระบบHOSxPXE4
ServerMTOL8.5+MDB-10.4.20,SlaveOL8.5+MDB-10.7.3
LOG=PostgreSQL11,INV=PostgreSQL11

ออฟไลน์ มนตรี บอยรักยุ้ยคนเดียว

  • Hero Member
  • *****
  • กระทู้: 5,369
  • Respect: +12
    • ดูรายละเอียด
    • โรงพยาบาลชุมชน ด่านมะขามเตี้ย
Re: php-5.2 สำหรับผู้ติดตั้ง CentOS แบบ 32 บิต (x86)
« ตอบกลับ #5 เมื่อ: กุมภาพันธ์ 09, 2011, 21:30:05 PM »
0
yum -y install libc-client libc-client-devel libmcrypt libtool-ltdl libtool-ltdl-devel mhash mhash-devel libxslt libxslt-devel gmp gmp-devel

เมื่อดาวน์โหลดมาแล้ว ก็ดำเนินการติดตั้งตามที่แนะนำไว้ด้านบนครับ

ถ้าติดตั้ง php-mcrypt ไม่ได้ก็ให้ติดตั้ง libmcrypt libtool-ltdl และ libtool-ltdl-devel ก่อนนะครับ
ถ้าติดตั้ง php-imap ไม่ได้ ก็ให้ติดตั้ง libc-client และ libc-client-devel
ถ้าติดตั้ง php-mhash ไม่ได้ ก็ให้ติดตั้ง mhash และ mhash-devel
ถ้าติดตั้ง php-libxml ไม่ได้ ให้ติดตั้ง libxslt และ libxslt-devel


1.โหลด Repo จาก webtatic.com มาติดตั้งครับ
rpm -ivh http://repo.webtatic.com/yum/centos/5/`uname -i`/webtatic-release-5-0.noarch.rpm

2.ติดตั้งใหม่(สำหรับเครื่องที่ยังไม่มี PHP)
yum --disablerepo=* --enablerepo=webtatic install php

3.หรือ อัปเดท(สำหรับเครื่องที่มีเวอร์ชั่นอื่นอยู่แล้ว)
yum --disablerepo=* --enablerepo=webtatic update php
เริ่ม11พย.2548OPD-Paperlessพร้อมHOSxPลดโลกร้อน
FF-Paperless(รพ.สค.)เริ่ม1ตค2555=100%
IPD-Lesspaper1ตค2560ระบบDmsByNeoNetwork
IPD-Paperless1พ.ค2562ระบบHOSxPXE4
ServerMTOL8.5+MDB-10.4.20,SlaveOL8.5+MDB-10.7.3
LOG=PostgreSQL11,INV=PostgreSQL11

ออฟไลน์ มนตรี บอยรักยุ้ยคนเดียว

  • Hero Member
  • *****
  • กระทู้: 5,369
  • Respect: +12
    • ดูรายละเอียด
    • โรงพยาบาลชุมชน ด่านมะขามเตี้ย
Re: ติดตั้ง TFTP Server บน CentOS
« ตอบกลับ #6 เมื่อ: กุมภาพันธ์ 09, 2011, 21:35:05 PM »
0
http://www.voip4share.com/

ขั้นตอนต่อไปนี้เป็นวิธีการติดตั้งโปรแกรม TFTP Server บน CentOS ครับ ง่ายๆไม่กี่ขั้นตอน ใช้ได้กับ Redhat Enterprise ได้ด้วย
yum -y install tftp tftp-server xinetd

2. ทำให้ tftp และ xinetd รันเป็นเซอร์วิส
chkconfig --level 35 tftp on
chkconfig --level 35 xinetd on

3. เปลี่ยนโหมดของไดเร็คตอรี่ tftpboot
chmod 777 /tftpboot

3. สตาร์ท xinetd มันจะสตาร์ท tftp server ด้วย
service xinetd start

4. ตรวจสอบ
ถ้า tftp server รัน มันจะรอรับคอนเน็คชั่นที่พอร์ต udp 69 ตรวจสอบด้วยคำสั่ง netstat
netstat -ln | grep 69

5. ก๊อบปี้เฟิร์มแวร์มาไว้ที่ /tftproot
เริ่ม11พย.2548OPD-Paperlessพร้อมHOSxPลดโลกร้อน
FF-Paperless(รพ.สค.)เริ่ม1ตค2555=100%
IPD-Lesspaper1ตค2560ระบบDmsByNeoNetwork
IPD-Paperless1พ.ค2562ระบบHOSxPXE4
ServerMTOL8.5+MDB-10.4.20,SlaveOL8.5+MDB-10.7.3
LOG=PostgreSQL11,INV=PostgreSQL11

ออฟไลน์ มนตรี บอยรักยุ้ยคนเดียว

  • Hero Member
  • *****
  • กระทู้: 5,369
  • Respect: +12
    • ดูรายละเอียด
    • โรงพยาบาลชุมชน ด่านมะขามเตี้ย
Re: วิธีการรีเซ็ต root password ใน mysql
« ตอบกลับ #7 เมื่อ: กุมภาพันธ์ 09, 2011, 21:40:52 PM »
0


1. Stop MySQL service ด้วยคำสั่งนี้

โค้ด: เลือกทั้งหมด
# service mysqld stop

2. แก้ไขไฟล์ /etc/my.cnf แล้วใส่บรรทัด skip-grant-tables ไว้ภายใน [mysqld] ดังตัวอย่างครับ

โค้ด: เลือกทั้งหมด
# vi /etc/my.cnf

โค้ด: เลือกทั้งหมด
[mysqld]
skip-grant-tables

3. Start MySQL service ด้วยคำสั่งนี้

โค้ด: เลือกทั้งหมด
# service mysqld start

4. ก็จะเข้า mysql โดยไม่ต้องใช้ password ได้เลยครับ พิมพ์คำสั่ง mysql แล้วกด enter ก็จะได้พร้อมท์ของ mysql เลย

โค้ด: เลือกทั้งหมด
# mysql


โค้ด: เลือกทั้งหมด
Welcome to the MySQL monitor.  Commands end with ; or \g.
Your MySQL connection id is 2
Server version: 5.0.77 Source distribution

Type 'help;' or '\h' for help. Type '\c' to clear the buffer.

mysql>

5. จากนั้นเซ็ต root password ใหม่ด้วยคำสั่งนี้

โค้ด: เลือกทั้งหมด
mysql> update mysql.user set password=PASSWORD("newpassword") where user='root';
แก้ไขค่า newpassword ตามใจชอบนะครับ แล้วพิมพ์คำสั่ง flush privileges เพื่อให้มีผล และพิมพ์ exit เพื่อออกจากพร้อมท์ mysql ครับ

โค้ด: เลือกทั้งหมด
mysql> flush privileges;
mysql> exit

6. แก้ไขไฟล์ /etc/my.cnf กลับคืนให้เหมือนเดิมครับ

โค้ด: เลือกทั้งหมด
#vi /etc/my.cnf

โค้ด: เลือกทั้งหมด
[mysqld]
#skip-grant-tables

7. รีสตาร์ท mysql แล้วลองเข้า mysql ด้วยพาสเวอร์ดใหม่ ก็จะเข้าได้ครับ

โค้ด: เลือกทั้งหมด
#service mysqld restart
เริ่ม11พย.2548OPD-Paperlessพร้อมHOSxPลดโลกร้อน
FF-Paperless(รพ.สค.)เริ่ม1ตค2555=100%
IPD-Lesspaper1ตค2560ระบบDmsByNeoNetwork
IPD-Paperless1พ.ค2562ระบบHOSxPXE4
ServerMTOL8.5+MDB-10.4.20,SlaveOL8.5+MDB-10.7.3
LOG=PostgreSQL11,INV=PostgreSQL11